PulseChain Bridge
PulseChain Bridge is a decentralized bridge that allows users to easily and seamlessly transfer Native and ERC-20 tokens from Ethereum to PulseChain and vice versa.
The world of crypto is evolving, and PulseChain is leading the charge as a Layer-1 blockchain designed to be a more scalable and faster version of Ethereum. With its 10-second block times (faster than Ethereum's 12–15 seconds), PulseChain emphasizes low transaction costs and increased speed. However, to access this high-performance network, you need to understand how to move your assets. This is where the PulseChain Bridge comes in.
This guide will walk you through how to add PulseChain to your wallet, buy PLS, and troubleshoot issues like pulsechain bridge not working.
What is PulseChain?
PulseChain aims to reduce Ethereum's congestion and high fees while providing compatibility with the Ethereum network. It features a deflationary tokenomics model where PLS is the native gas token required for all transactions. PulseChain allows users to avoid Ethereum's network congestion while maintaining compatibility with Ethereum-based assets.
To transact on PulseChain, you need PLS tokens for gas fees. PulseChain utilizes a proof-of-stake consensus and a decentralized validator network to minimize single-custodian exploits.
How the PulseChain Bridge Works
PulseChain bridge connects PulseChain with other networks, allowing seamless asset movement and leveraging low-cost environments for DeFi activities. It operates under a decentralized validator network that monitors the locking of assets and signs off on transactions.
This bridge maintains a 1:1 asset relationship using a lock-and-mint mechanism. A smart contract locks original tokens on the source chain and mints wrapped tokens on the destination chain. This secure tool facilitates moving tokens between the PulseChain network and other blockchains, utilizing validators and smart contracts.
PulseChain bridge allows users to receive free copies of their Ethereum tokens on the new network through airdrops.
Setting Up: PulseChain Chain ID - Add PulseChain to Wallet
Before you can bridge pulse chain assets on your device, you must set up your wallet. To set up a Metamask wallet for PulseChain, you need to add the network details manually or use the automatic method on PulseChain.com.
Enter these settings in your wallet:
PulseChain Network Configuration
Network Name: PulseChain
New RPC URL: https://rpc.pulsechain.com
Chain ID: 369
Currency Symbol: PLS
Block Explorer URL: https://scan.pulsechain.com
Refer to the provided image for a visual guide on adding PulseChain to Metamask. You can click the image to view it in full size.
Visual guide on adding PulseChain to Metamask. Click the image to view it in full size.
Once added, you can choose the desired network from the dropdown menu in your Metamask wallet to switch between Ethereum and PulseChain blockchains.
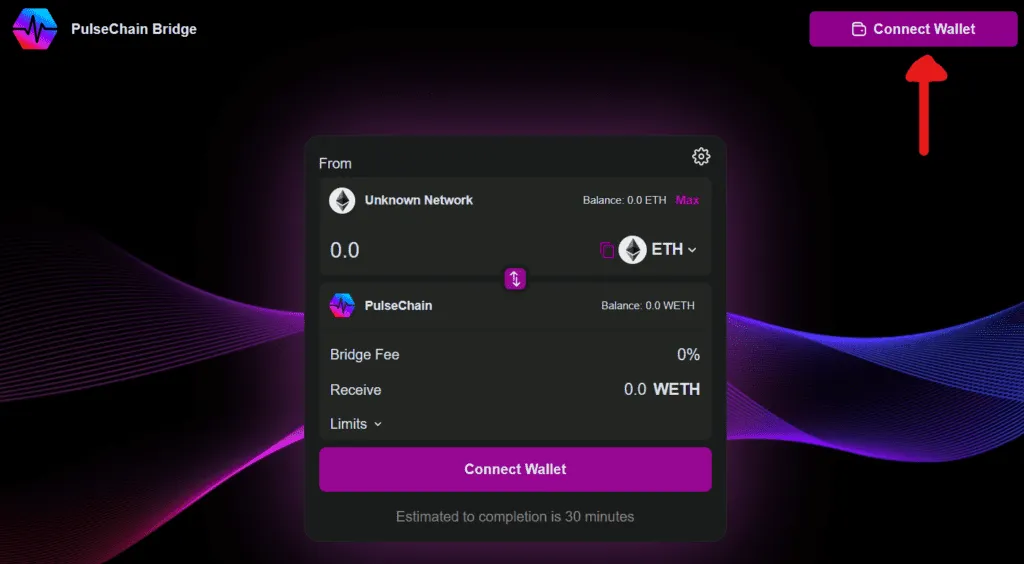
How to Bridge PulseChain: Step-by-Step
To transfer assets from Ethereum to PulseChain, you'll need to use the PulseChain Bridge.
- Visit the official Bridge PulseChain website.
- Connect your wallet.
- Choose the token (e.g., ETH, HEX) you want to bridge.
- Enter the amount and confirm.
Make sure you have PLS tokens in your wallet to pay for gas fees on PulseChain.
Visual walkthrough of the bridging process. Click the image to enlarge it.
The average time for bridge PulseChain transaction processing is between 15–30 minutes. You can monitor the bridge status by visiting PLSburn.com after initiating the bridge transaction. Once your tokens have been successfully bridged, you can utilize them on PulseX, the primary decentralized exchange of PulseChain.
Bridge Pulse Chain - Acquiring Gas: Buy PLS and ETH
You can buy PLS from OKX.com, the #2 exchange in the world that recently listed PLS. You can also buy PLS directly via bank on 0xCoast or Rampnow.
Alternatively, you can buy ETH to bridge to PulseChain using mainstream platforms such as Kraken or Coinbase. Then, use the PulseChain Gas Bridge, a platform that facilitates the exchange of ETH on Ethereum for unwrapped native PLS on PulseChain.
Benefits of Pulse Bridge or Bridge Pulse on PulseChain
Bridging your assets to PulseChain unlocks a host of advantages for both new and experienced crypto users. By adding PulseChain to your wallet—using the network name "PulseChain" and chain id 369—you gain access to a high-speed, low-fee blockchain that's designed for seamless interaction with Ethereum-based tokens. Whether you want to buy PLS, bridge ETH, or connect to innovative services, the Pulse Chain bridge makes the process straightforward and efficient. Once the bridging process reaches completion, you can connect your wallet to PulseX and start exploring a world of decentralized exchange options.
Here are some of the top benefits of bridging on PulseChain:
- Lower Transaction Fees: Enjoy significantly reduced fees compared to Ethereum, making every transaction more cost-effective and allowing you to maximize your crypto holdings.
- Faster Transaction Times: PulseChain's optimized network processes transactions in just seconds, so you spend less time waiting and more time accessing your tokens and services.
- Deflationary Tokenomics: The PLS token is designed with a deflationary model, which can help support its value over time as the supply decreases.
- Seamless Ethereum Compatibility: Since PulseChain is forked from Ethereum, you can easily bridge your ETH and ERC-20 tokens, and interact with familiar dApps and services.
- Direct Access to PulseX: After bridging, connect your wallet to PulseX to swap, provide liquidity, or farm a wide range of tokens like PLS, HEX, and INC.
- Multi-Wallet Support: PulseChain works with popular wallets such as Metamask, Rabby, and Internet Money, giving you flexibility in how you manage your assets.
- User-Friendly Bridging Process: The PulseChain bridge is designed for simplicity, making it easy to transfer tokens from Ethereum and get started on the new network.
- Expanding Ecosystem: With a growing base of developers, services, and community support, PulseChain offers increasing opportunities for users and projects alike.
- Easy PLS Purchases: Buy PLS directly via bank transfer on platforms like 0xCoast or Rampnow, so you can quickly acquire the native gas token needed for transactions.
- Emphasis on Risk Management: PulseChain encourages users to understand the risks, do their own research, and make informed decisions before bridging or investing.
To get started, simply visit the official PulseChain website, follow the instructions to add the network to your wallet, and search for step-by-step guides or community support if needed. Always remember to check the details, understand the process, and prioritize your security. Thanks for choosing PulseChain—your gateway to a faster, more affordable crypto experience.
Troubleshooting PulseBridge: PulseChain Bridge Not Working or PulseChain Transaction Not Found
Sometimes, users face issues where they experience pulsechain bridge not working or pulsechain transaction not found. Often, this is just a UI delay or a missing token import.
If you encounter a pulsechain transaction not found error:
- Check Etherscan for the address history.
- Find the transaction on the PulseChain side using PLSburn.com.
- Import tokens on PulseChain using the correct token addresses in your Metamask wallet.
Commonly searched as pulsechainbridge, pulse chain bridge, pulsebridge, or bridgepulse, this tool is robust. If your transactions seem stuck, continue to check the block explorers.
PulseBridge, BridgePulse, Pulse Chain Bridge
Pulse Chain bridge offers significantly lower fees and faster transactions compared to bridging on Ethereum, due to its scalable design. By understanding the ways to buy PLS, add PulseChain, and use the bridge, you can fully access PulseChain-native applications like PulseX for liquidity provision and farming. Thanks to PulseChain, the risk of high fees is a thing of the past. Visit the sites, do your research, and read post updates from developers (often found as inc entities) to stay safe.
This video is relevant because it visually demonstrates the bridging process and specifically addresses the common issue of coins seeming to disappear after bridging, explaining how to claim them.